My
previous attempts at collecting Oca seed have been frustrated by circumstances, but I've finally made the vital step in oca one-upmanship. And here's the proof...
... several tiny seeds safely retained in their capture-bag, along with their spent seed pods. So why it it so tricky?
Well, firstly Oca is an outbreeder; you will need to have multiple varieties (the more the better) for a good chance of compatible flower-types occurring simultaneously (flowering is sporadic). Grow them mixed closely together to improve chances of natural pollination.
Wait for (or perhaps try to induce) flowering. This can happen anytime during the growing season, but seems to be linked to available moisture or (my theory) high air humidity, as I've noticed that flowering reliably occurs whenever there is dew in the mornings. It would be interesting to confirm this using a misting system, but anyway, flowering seems far more common in wetter parts of the world, and definitely does not happen during hot dry weather.
Next, you need to be able to identify the three flower types, and understand the legitimate pollination combinations. There is a
good explanation of this from Rhizowen, but here it is in very simple terms.
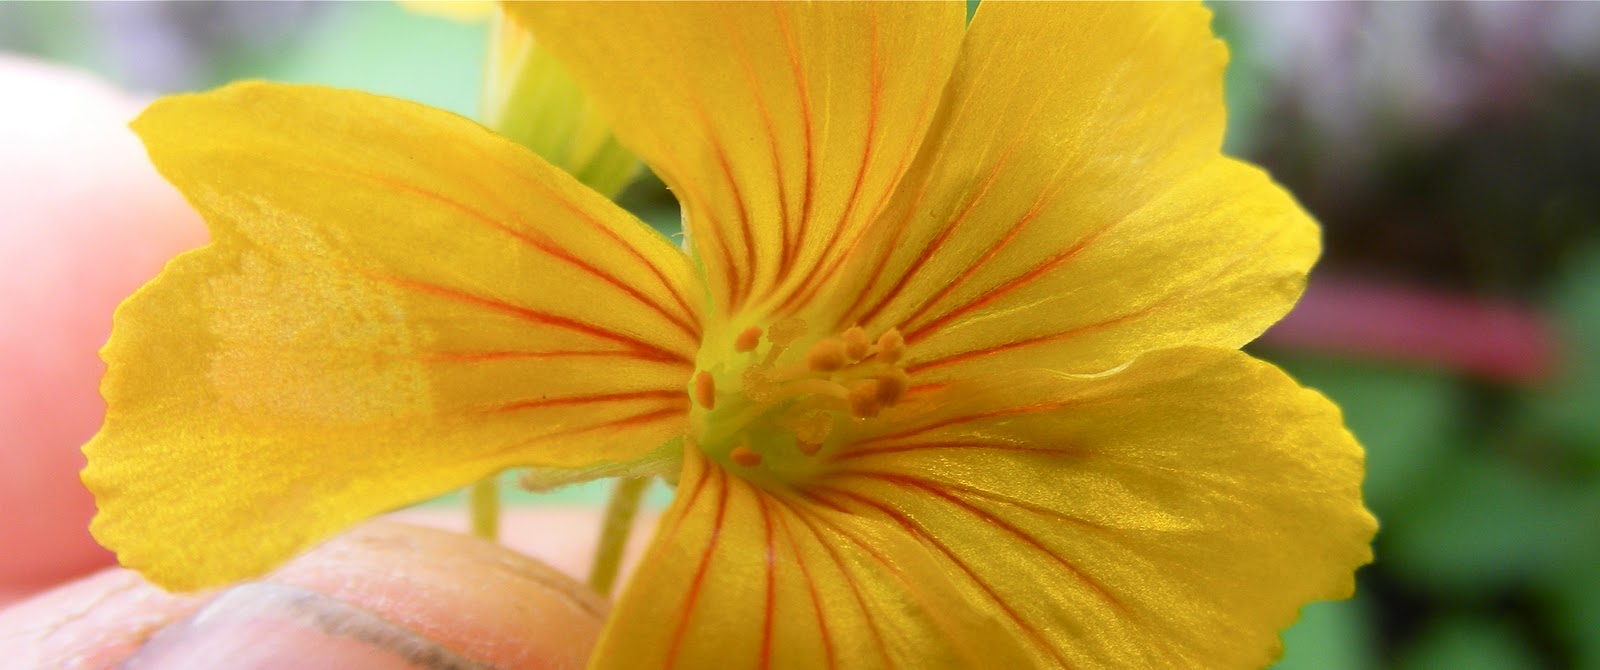
It's all about the pointy bits in the middle of the flower (I did say it would be simple!).
In this Oca flower, the longest pointy bits are pale yellow, while the shorter ones are dark yellow...
...so this is 'long-styled'. The pale yellow parts are female, while the darker yellow are male, producing pollen.
So what would you call this one where the pale yellow parts are shorter than the others?
...yup, short-styled.
And to make the full set, here is the mid-styled model...
Now comes the tricky bit. Flowers of the same type cannot pollinate each other, and even if you have two different types of flower, the pollen must come from the specific length of male pointy bit that matches the length of the female pointy bit being pollinated. Phew, that's the end of the technical bit.
Actually it's not strictly necessary to know all that, unless you plan to do the pollination manually. If you have bees, hoverflies, or other natural pollinators, you can just sit back and wait for the next stage. However, I have obtained higher levels of success from manual pollination (5 to 7 seeds from each flower compared with 1 to 3 when leaving it to nature).
If you take the route of manual pollination, you will need to attend to your plants during the early afternoon when the flowers are most likely to be open.
This year I have marked all of the manually pollinated flowers with brightly coloured electrical tape so that they don't get lost in the still-expanding mass of foliage.
After a week or two, it's possible to differentiate between fertilised and unfertilised pods. The photo below shows one of each; the top one is swollen, and looks like it has a full compliment of seed inside. The lower one is limp, and will soon drop from the plant, confirming that it has not been fertilised.
At this stage it's okay to leave fertile pods, safely highlighted with coloured tape, on the plant to mature. But this is not the time to go on holiday to Marbella for a fortnight. It's necessary to check every couple of days for a change in appearance in the pods; they take on a more muscular appearance, sometimes puckering up their nose ready to explosively discharge their seed. This one is ready to pop at any time...
At this point I add polythene catch bags...
...and with luck, after a day or two the pods will have blown apart, shooting their tiny brown seeds into the corners of the bags...
I'm getting a few more every day, so if the weather holds I should be well provided with seed for a mass sowing and selection next year.
Out of interest, not all Oca flowers conform to one of the three regulation patterns; here's a double flower that's never going to get pollinated naturally...
.